These instructions are optimized for Thunderbird versions 2.0.0.4 and higher. Download Thunderbird and its updates for free.
There are a few things you should do first before beginning:
Note: The password you set at the above website is independent of your normal ASURITE password. If you change your ASURITE password in the future, your Gmail for ASU POP/Chat password will not be changed. However, you may always go to the above website to change your Gmail for ASU POP/Chat password.
After you have followed the steps above, follow instructions below to set up Thunderbird:
- Start Thunderbird.
- If this is the first time that you've started Thunderbird, the New Account Setup Wizard will appear when you start Thunderbird.
- If you see this wizard, simply click "Cancel", then click "Exit."
- If you do not see the wizard, continue to Step 2.
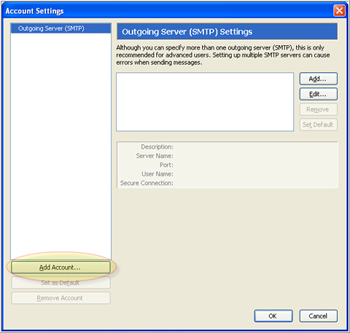
- Go to the Tools menu and select Account Settings.
- Click the Add Account... button.
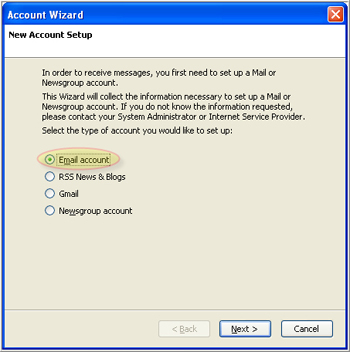
- Select Email account and click Next.
- Enter your name and your ASURITEID@asu.edu email address in the appropriate fields and click the Next button.

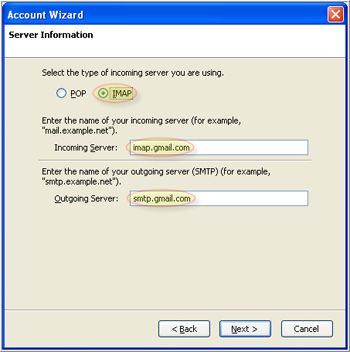
- Select the IMAP option.
- Enter imap.gmail.com into the Incoming Server field.
- Enter smtp.gmail.com into the Outgoing Server field.
- Click the Next button.
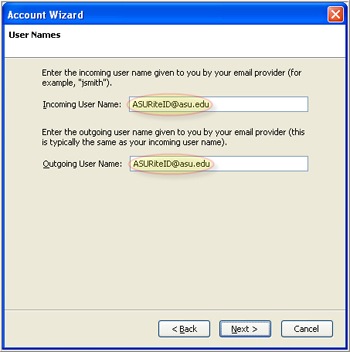
- Enter your ASURITEID@asu.edu into the Incoming User Name and Outgoing User Name fields. For example, if your ASURITEID is jdoe99 then you would enter jdoe99@asu.edu. Click the Next button.
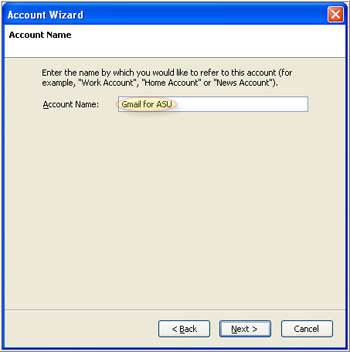
- Enter an account name of your choice and click Next.
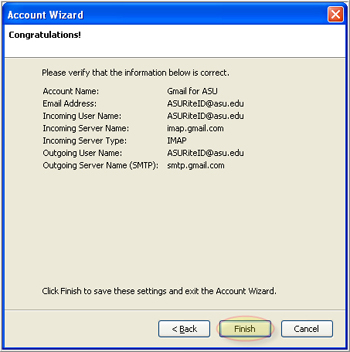
- After verifying that your information is correct, click the Finish button.
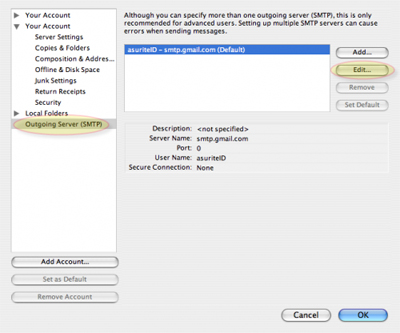
- Go to the Tools menu once more and select Account Settings. Under the account that you created, select Server Settings.
- Ensure that SSL is selected
- After selecting SSL, ensure that the port number has changed to 993.

- On the left side of the screen, choose Outgoing Server (SMTP). Select the smtp.gmail.com entry and click the Edit button.
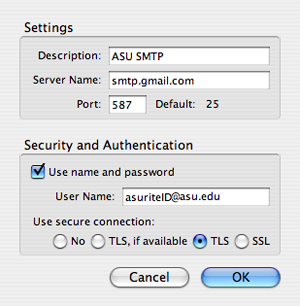
- Outgoing Server Settings:
- Description: ASU SMTP
- Server Name: smtp.gmail.com
- Port: 587
- Ensure that Use name and password box is checked.
- Username: your ASURITE ID@asu.edu.
- Use secure connection: TLS
- Click OK.
You can now securely send and receive mail using Thunderbird.
Need additional help? Access 24/7 live chat, create a case from your My ASU Service Center or call 855-278-5080.
