To setup wireless on your Ubuntu Linux device, please follow the steps below:
Note: Ubuntu, like other versions of Linux, gets frequent updates. Because of these frequent updates it is possible that your version of Ubuntu may not look exactly the same as the screenshots in this article.
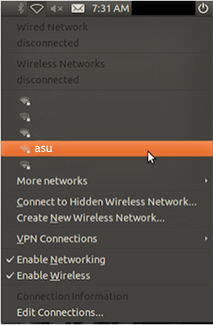
1. Click on the wireless icon on the top right of the desktop. A list of networks will populate. If it doesn’t, make sure your wireless is enabled.
2. Click on the Wireless connection named asu.

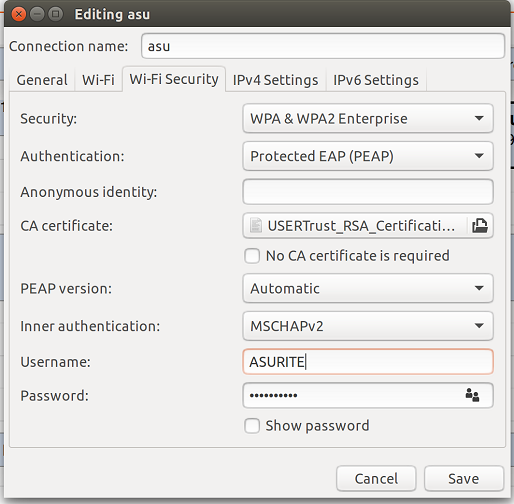
3. You will want to configure the settings as they are displayed below. If you do not see the wireless security option for WPA & WPA2 Enterprise, your adapter may not support the ASU Wireless.
4. Click the icon next to “CA certificate” that says (None).

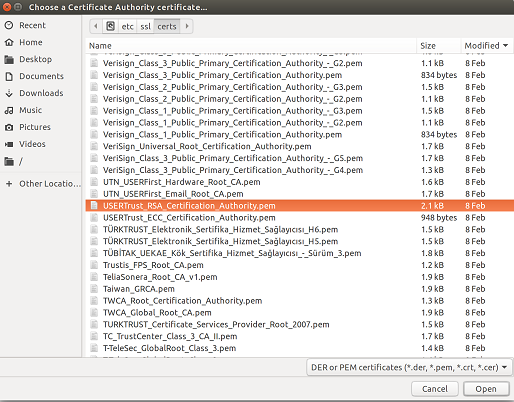
5. Navigate to the etc folder within your File System folder. Double click the entry that says etc.

6. Double click the ssl folder.

7. Double click the certs folder.

8. Click the USERTrust_RSA_Certification_Authority file, then click open.

9. Once the preceding steps are completed, click the connect button and the ASU WiFi should connect without issue.

You are now on the ASU wireless network! Note: Users who connect to the ASU network, wired or wireless, should be in compliance with the Acceptable Use of Computers and Networks policy, including security measures.
Need additional help? Access 24/7 live chat, create a case from your My ASU Service Center or call 855-278-5080.


